 I have been building furniture for more than 30 years. I derive enormous pleasure from working on a new project, and my bride is always pleased to receive a new piece of furniture. Somehow her "honey do" list never seems to get smaller. Over the years, my resume includes traditional Queen Ann and Chippendale style antique reproductions, early American tables and cabinets, to weathered Adirondack chairs and tables and of course, log furniture.
I don't build from plans, but I often draw up some ideas to help me visualize what I think I want to build. One of my latest projects was a log hutch for our dining room. The finished cabinet is rather large measuring more than six feet tall and equally as long with cabinet depths of almost sixteen inches. You could build this piece to fit any requirements you might have. To see how I did it, see my DIY log china closet, go here.
A few days ago (note that this posting was moved and the comment appeared a while back) I received a comment from a reader asking for the dimensions of the log hutch I featured last year in our Log Furniture Directory (here). It seems he was going to build such a project and wanted more information. Sorry, but I had no plans... when I decided to begin that project, I didn't have any 'formal' plans from which to build this hutch - other than what I drew-up prior to cutting my boards.
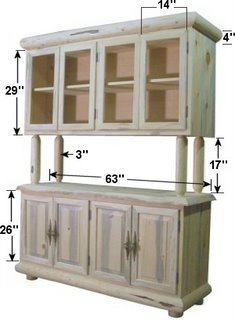
In answer to the request, I measured the outside dimensions of my hutch and am including the details here. You should be able to read all of the measurements in the above picture - all dimensions are quoted in "inches". The wood I chose for our hutch is Ponderosa 'Blue Pine', because our home features ceilings and trim using wood of that variety. However, you can use any wood that you prefer.
I had rough dimensions of what I wanted this to look like based on where we planned to put it in our home. I knew I would use a basic design of a stacked case with four doors in each section. The rustic accents are what adds the character. Around the top and bottom case, I used a 4" half log to trim the cabinets and add visual balance. The case rests on 4" log legs to raise it above the floor for easy moving and cleaning.
The unit is basically two cabinets. The top case rests on a hidden shelf attached to the four log uprights via a mortise and tenon joint. This shelf houses recessed lights that are turned on by touching a hinge. No wires or switches are exposed.
The details of how this log hutch was made is featured on our website, so I won't repeat everything here. If I'm forgetting anything, or you have another comment or question... please let me know. Enjoy!
You will notice that I did not give "depth" dimensions for either case. I omitted this because I didn't want to influence your project with such a dimension, but let it be dictated by the size of the server (top) slabs you can obtain (or choose to glue-up). Both the length and depth of this piece of furniture will be influenced by where you intend to place it. In our situation, our dining area was large enough to accept a footprint of more than 5' by 20".
SPECIAL NOTE:
The log china closet I made for my wife is not something that one would find in most furniture stores. If you have a truly unique creation you have made and would be willing to outline the project with a few pictures and descriptions, I know that our readers would love to get new ideas. Obviously, I can't list every project that comes our way, but if yours is interesting or outside the ordinary... I would love to include it here. I look forward to hearing from you!
 A few years ago when I began putting together the


